|
INTRODUCTION
The experimentation with the process of Cuir Bouilli, and the eventual creation of near-authentic period armour, was all undertaken on my four-element electric kitchen stove. Water was placed in the biggest enamelled-steel roasting dish I could get onto the back right element (which meant I had to �prop up� the edge of the pan where it reached beyond the element). The water was brought up to a �rolling boil�, and then the leather added to the water. When the leather was removed from the water it was placed under a heavy wooden chopping block (weighted with a big rock) while it dried so that the piece laid flat. I wore kitchen rubber-gloves, and armed with a clock and a pair of tongs, began my experiments 1 as outlined below. |
|
|
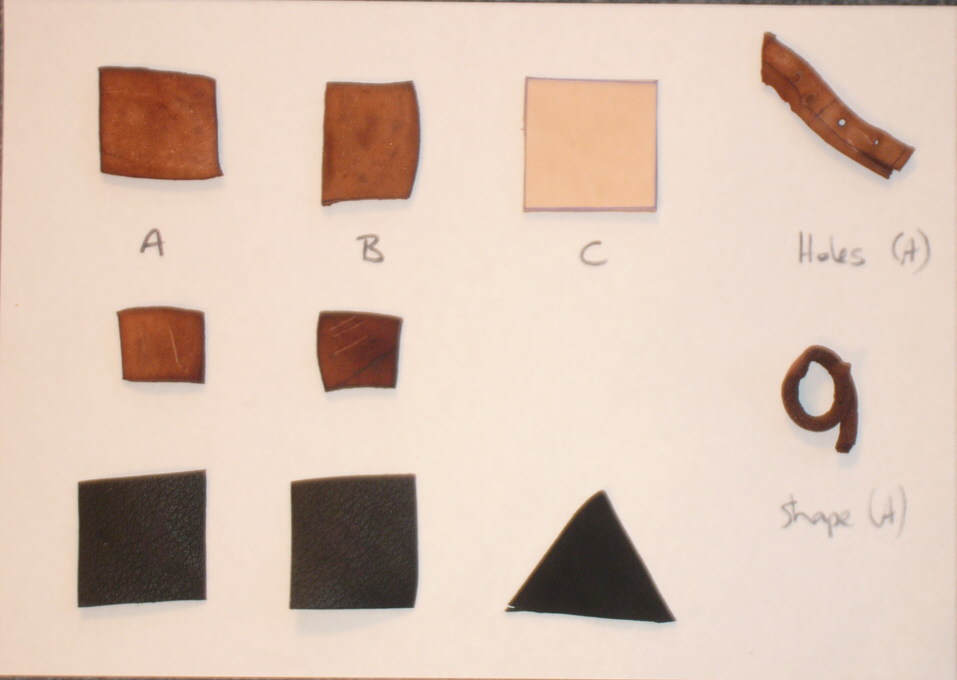
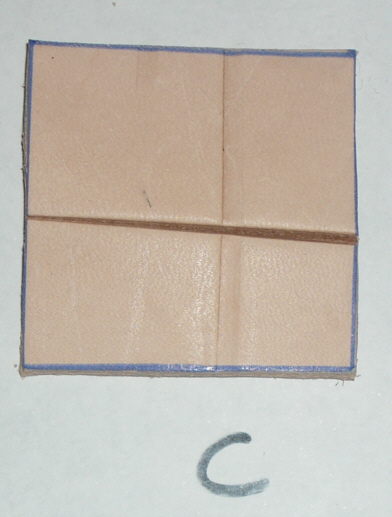
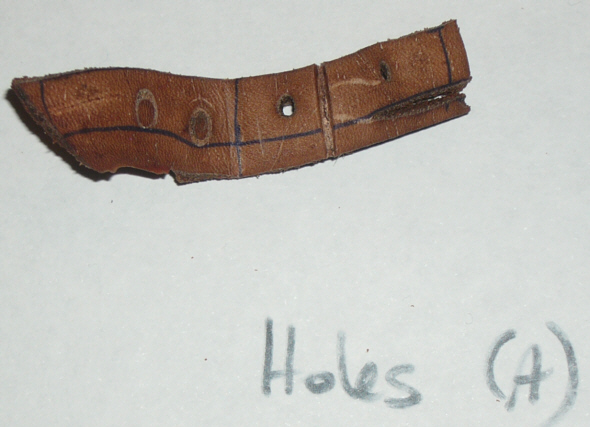
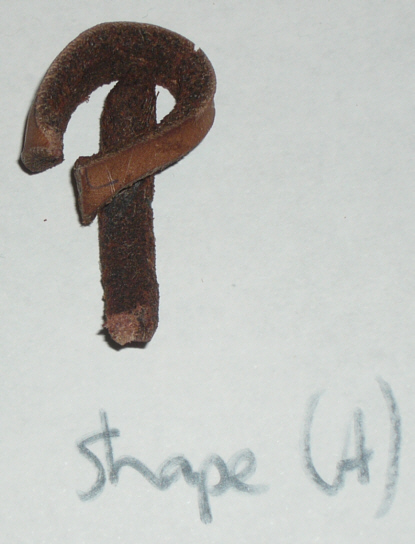
FIRST SHRINKAGE EXPERIMENT Rows: 1. Originally 4 cm x 4 cm bark-tanned leather (3 mm [7-8 oz] "russet") 2. Originally 2 cm x 2 cm bark-tanned leather (3 mm [7-8 oz] "russet") 3. Originally 4 cm x 4 cm chrome-tanned leather (1.2 mm [3 oz] dress leather) Columns: First column (A): 20 seconds in boiling water Second column (B): 40 seconds in boiling water "Holes": 40 seconds "Shape": 40 seconds |
|
|
Shrinkage Spreadsheeted Results All bark-tanned pieces reached polymerisation temperature and therefore gained significant hardness. As part of this process each lost a percentage of length and width (i.e., they shrank!), and became significantly thicker. In some cases this resulted in the skin side becoming slightly smaller than the flesh side and pressing with weights was important to prevent curling at the edges. As expected, there was no change at all to chrome-tanned leather. (As chrome-tanned is non-period, it was included in test purely out of curiosity!) |
|
|
STRENGTH TEST The cuir bouillied materials were allowed to dry for several days. They were then hit with both the front (sharp) edge of a large meat cleaver and the back (blunt) edge of the cleaver - all full strength blows. The blunt edge of the cleaver shows as shiny lines in most cases, actual cuts are from the front edge. N.B. Chrome tanned not strength tested. PHOTO OF CLEAVER TO COME! |
|
|
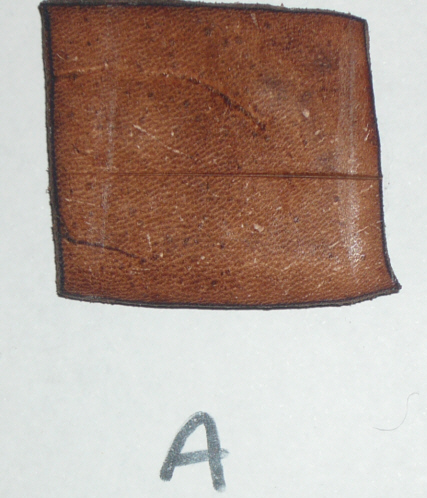
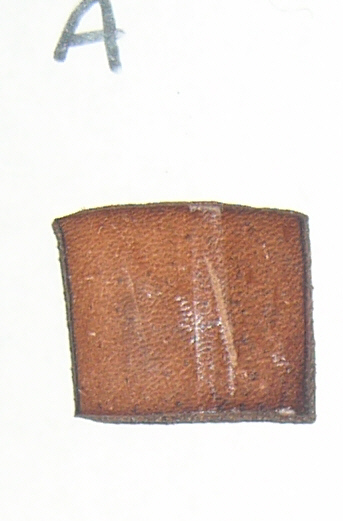
Shrinkage and Strength Test details: A1 - lightly dented by back of cleaver; surface cut with sharp edge. |
|
|
Shrinkage and Strength Test details: A2 - lightly dented by back of cleaver; surface marked with sharp edge. |
|
|
Shrinkage and Strength Test details: B1 - lightly dented by back of cleaver; surface cut with sharp edge. |
|
|
Shrinkage and Strength Test details: B2 - lightly dented by back of cleaver; surface cut with sharp edge. |
|
|
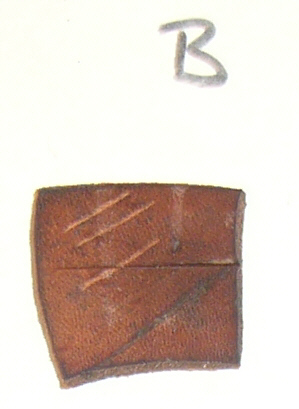
Shrinkage and Strength Test details: C - heavily dented by back of cleaver; cut almost through with sharp edge. Looks uncannily like human skin! |
|
|
Shrinkage and Strength Test details: "Holes" - lightly dented by back of cleaver; cut almost through with sharp edge - suspect largely as size and shape made more fragile than square pieces. Holes punched before prior to boiling remained but were distorted, so decided to test by drilling holes after boiled. (These test holes can be seen in the Second and following Shrinkage tests). |
|
|
Shrinkage and Strength Test details: "Shape" - broke when hit with back of cleaver. Conclude tight coils coupled with narrow width too fragile for cuir bouilli armour! |
|
|
Conclusion: - 7-8 oz/3 mm bark-tanned leather works well to distribute impact with a blunt edge, and appears to take the brunt of a sharp edge blow. However, it does cut nearly through, so while it would be better than no armour, certainly wouldn�t be first choice if cuir bouillied available. - 7-8 oz/3 mm bark-tanned leather, when cuir bouillied, stands up to significant sharp-edged impact, no appreciable difference between 20 seconds of boiling and 40 seconds. As the vertical (down the hide from mid-back to leg) shrinkage is significantly less at 20 seconds, this was chosen as the appropriate time. |
|
|
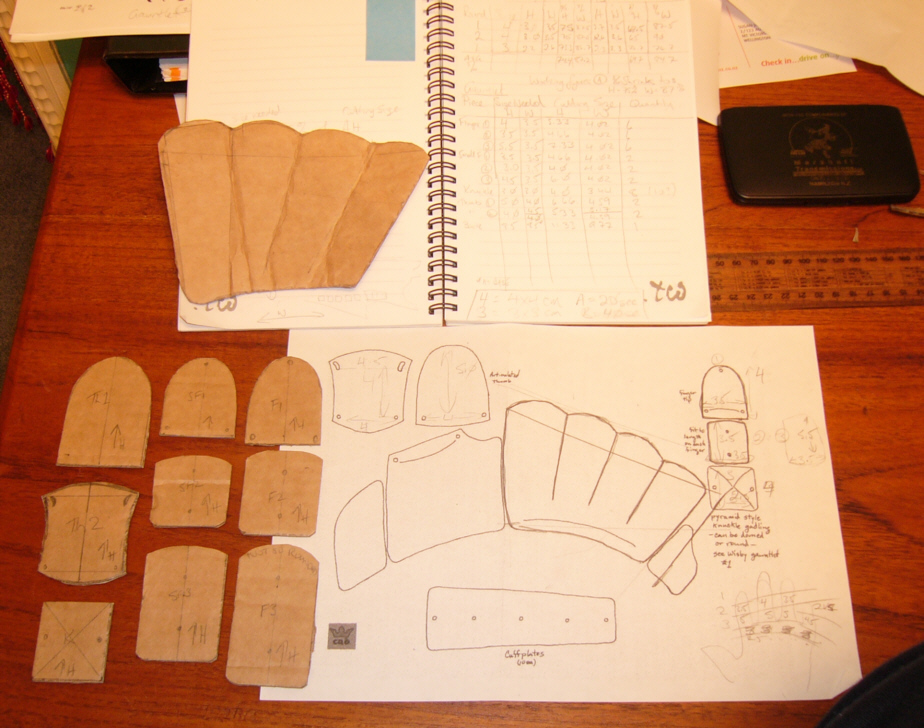
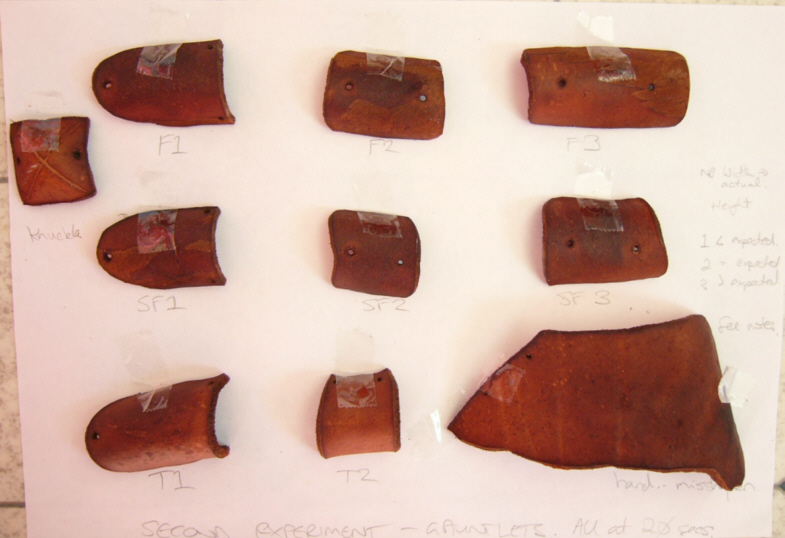
FINGERED GAUNTLETS The next step was to check out the shrinkage calculations on real pieces. I planned to build cuir bouilli Finger Gauntlets on the Wisby model. The pattern used is based on ones for steel gauntlets 2 . Pattern pieces were cut from cardboard based on the averaged shrinkage figures of height 75% and width 87% 3 . (For full cutting figures see Gauntlet Spreadsheeted Results below.) |
|
|
Fingered Gauntlets - Shrinkage outcomes The cuir bouilli outcomes were generally very good in terms of hardness achieved and lack of distortion. The exception was the back-of-hand piece which distorted almost unbelievably. Shrinkage rates were odd. (See Gauntlet Spreadsheeted Results below). |
|
|
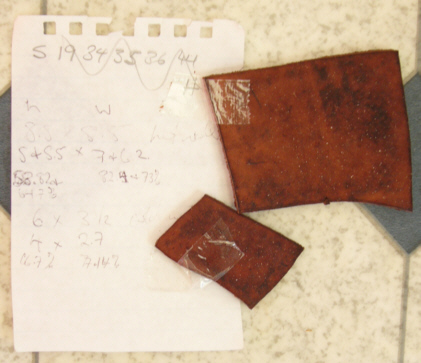
Gauntlet Spreadsheeted Results The outcomes were unexpected, to say the least. The shrinkage (barring the back-of-hand piece) in height (down the hide) ranged from 56 - 92%, with the majority at the minimal shrinkage end of the range. However, the width measurement (along the hide - from head to tail) actually increased in most cases (one exception was 99% of original size). The increases ranged from 102 - 116%! The only explanation I could find was that, unlike the first test where pieces were simply pressed under weights, each piece was moulded to shape along a broom handle and was stretched in the process. Hardness is at a good level. The other oddity is the back-of-hand piece which shrank to 66% in height and 51% in width. I have no suggestion to offer on this one. Unfortunately, with the much smaller rate of shrinkage, none of the pieces will fit my hand! |
|
|
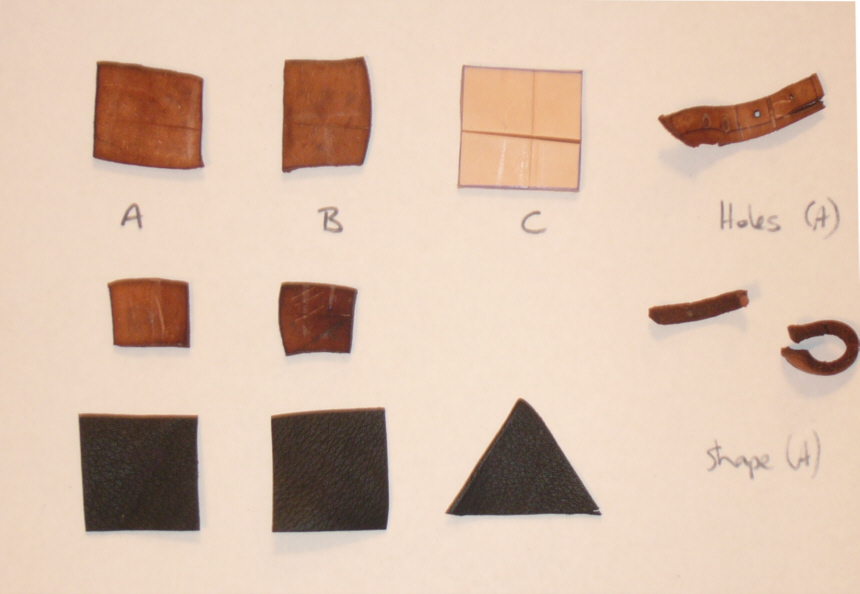
SECOND SHRINKAGE TEST After a break from experimenting for four months, I decided to check whether larger pieces shrink at the same rate as the smaller pieces in the first shrinkage test (With hindsight, I should have done this before doing the gauntlet testing!).
|
|
|
THIRD SHRINKAGE TEST Brief soaking in cold water tried with much better results. |
|
|
FOURTH SHRINKAGE TEST This test incorporated the lessons learnt in previous tests. This time the test was to compare results between leather placed skin down into boiling water vs skin up in simmering 4 water as had formed the impression that skin up in boiling water curled and distorted more. Those in the left column were all briefly soaked in cold water (as above) and placed in water for 20 seconds.
Conclusion: leather placed skin down in boiling water shrinks more evenly than leather placed skin up in simmering water. Leather on right was not soaked and so was placed dry in simmering water for 20 seconds. Uneven shrinkage resulted even though only simmering. NB Holes in leather were placed there later as part of testing the drilling vs the punching of holes. |
|
|
FIFTH SHRINKAGE TEST Thermometer purchased and used, heat held just below 100° C (212°F). In addition, a small cake-rack (used for cooling cakes in the pan when they come out of the oven) was purchased and placed in the bottom of the pan to reduce risk of contact with direct heat at base of pan. Results interesting!
|
|
|
Lessons: 1. Use a Thermometer: Although the process is called �boiling leather�, over-boiled leather shrinks horrifically, comes out like cooked bacon, and is rather fragile. The boiling point of water is reached at 100° C (212° F), but just leaving the pot boiling on the stove doesn�t mean that the water sits at boiling point unless you turn it down. As I was using methods described by Marc Carlson 5 and David Friedman 6 I eventually purchased a jam/jelly thermometer and discovered that what a cook calls a "rolling boil" was actually in excess of 120° C (248° F)! 2. Cold Soak First: Briefly soaking the leather piece in cold water until the bubbles stopped reduced shrinkage and extended time the piece could be in the boiling water. The latter point proved useful when shaping larger pieces where the leather had to be revolved through the water as it couldn�t be all immersed at once. 3. Avoid direct contact with pan bottom: The leather scorched easily on the bottom of the pan, so I placed a metal cooling rack (as used for cakes etc) in the bottom. If the temperature was too high, or the leather sat in one place too long, minor scorching still took place but it was restricted to the fine lines of the rack and didn�t seem to affect the outcome. 4. Maintain consistent direction: Cuir bouilli has a tendency to shrink at a different rate depending on the "grain", i.e., the shrinkage rate down the hide (mid-back to leg) is different than along the hide (head to tail). It pays therefore to align pieces the same way as you can allow for the same amount of shrinkage in each direction. You can also utilise this property when you want curves, e.g., for the fingers of the gauntlets I set the width in alignment with the greatest shrinkage as I could then use the tendency of the leather to curl in that direction to shape the curve of the fingers. 5. Watch out for �False Economy�: I thought to save money while I learnt so purchased a "second grade" hide. This proved to be false economy as cuts, scrapes, and tick holes in the hide resulted in uneven shrinkage leading to some cuir bouillied pieces resulting in either weakened pieces or distortions. As well, some of the hide cannot be used at all for cuir bouilli (though it is OK for some plain leather work). 6. Finally, my thanks to all the folks who have shared their expertise on the Internet, and Marc Carlson and David Friedman in particular. I�d like to re-iterate Marc�s opening comments on his very useful page as my results bear him out: "I would like to stress something that is often insufficiently stated, if stated at all, during the various descriptions of leatherwork in general, and in this case, specifically of the various ways to make Cuir Bouilli. Since we are dealing with an organic substance, and I refer to "organic" in more than its merely having once been alive, each piece is unique and will handle differently. Two otherwise similar bits of leather can react quite differently. What this means is that you can do everything described hereafter perfectly and still have your project fail, or at least come out with a finished product that is not up to what you had hoped. Don't be discouraged. Leather hardening is not always a "cut and dried" science when dealing with the levels of technology we are working with." (site: see footnote 5) |
|
|
FOOTNOTES 2 Adapted from Master Cad's (M Davis) original site, now found at: http://www.mallet-argent.com/images/wisby_gauntlet_pattern.jpg Return to text 3 Averaging shrinkage figures based on the 20 second immersion tests seemed relatively safe, though this would have been less so if the 40 second immersion had been chosen as the range of shrinkage was much wider. Return to text 4 Simmering water is water brought up to boil, then heat turned down to �, slightly bubbling, vs boiling water, which is water brought up to rolling boil and then held just below that at 2/3rds mark. Return to text 5 "Leatherworking in the Middle Ages"; Compiled and edited by I. Marc Carlson Revision 3 March 2003, http://www.personal.utulsa.edu/~marc-carlson/leather/hl.html (since revised 2004) Return to text 6 David Friedman (Cariadoc), pg 7, http://www.personal.utulsa.edu/~marc-carlson/leather/hl.html Return to text |
|